A few weeks ago I started a new education with focus on baking and café life. Every day I spend about 4 hours in the bakery learning how to make different things, work different types of dough and braid using different techniques and I've been using my new skills while baking at home as well. Last weekend I spent almost an entire day playing with what we call wiener bread. It is what you would call a Danish in English as far as I know. The fun part is getting my hands on real bakery recipes - I am copying them all, or as many as I can at least. The only problem is that the recipes usually call for obscene amount of ingredients. One recipe used about 10 kilos of flour - after I HALVED the recipe. That's hardly something I would do at home. I would need to borrow the whole neighborhood's freezers to store all the bread that would give me.
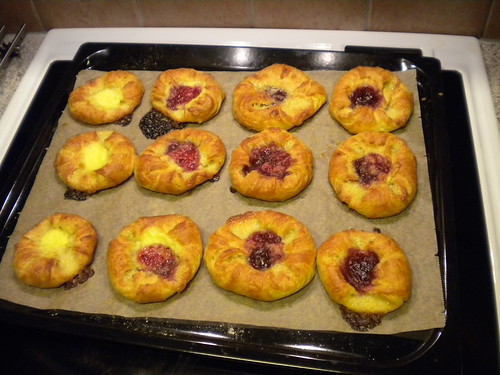
Anyway, here are some pictures of the Danishes that I made at home last week.
This is the classic type of wiener bread that you will most likely find in a store or bakery shop.
And here is my favorite. It doesn't have jam or vanilla custard filling like the ones in the picture above, but it is so moist and nummy, and a little less sweet. This braid that I made isn't very visually appealing because I made it a little too big. I probably could have made 4 braids instead of 2 with that amount of dough. Maybe next time.

And here is the inside of my favorite braid. You can see all the layers of dough and how moist and gooey it is.

In case you have no idea what wiener bread is all about, this is how it's made: You start by making a dough that is similar to the ordinary sweet wheat based dough but you don't quite knead it as hard. It can be just a little bit sticky too. You then push your dough out into a big square and put a big block of margarine in the middle. Fold/pull in the edges over the butter to cover it, then beat it a little bit until the dough and butter is stuck together. You then grab your rolling pin and roll it out, gently, into a rectangle. Fold it in 3 parts, turn 45 degrees and let it rest for 5 minutes - possibly in the fridge depending on what kind of margarine you're using. Repeat the steps from rolling pin and on 2 more times and your basic wiener dough is ready to shape into whatever it is you're making.
This method makes the dough very flaky as it bakes and very moist on the inside. Definitely worth the effort.
As for the filling: For the classic style wiener bread you cut out squares of about, say 10 cm, and then you put a small dab of something called remons which is pretty similar to buttercream in the middle of the square. Take each corner and pull it to the center and squish it into the remons. This hole will later be filled with custard or raspberry jam or whatever the baker likes.
There is so much more to talk about and I have so many other projects that I would like to discuss but I just got home from a party and I am exhausted. I hope to update the blog over the next few days to show some of my other baking adventures that I've had lately.
No comments:
Post a Comment