Thursday, October 13, 2011

Competition and my go-to recipe for Lemon Meringue Pie

So, I logged in at bloglovin.com - that is where I keep all my favorite blogs nowadays. They're so many now that I can't possibly keep track of them all on my own. Anyway, through bloglovin I found out that Smulan over at Smulans Bakblogg is holding a competition and the prize is three(3) Flame Boy Burners. The question she asks us is "What would you want to make if you owned a burner?".


Easy! The first thing that popped into my head was Lemon Meringue Pie.
If you remember; I have made lemon meringue pie several times and my favorite meringue to top the pie with is the meringue of all meringues(in my opinion at least): Italian meringue!

Here's the catch tho. Italian meringue is gorgeous. The texture is amazing and I would eat the whole batch of it straight out of my mixing bowl if I could. But when you bake it in an oven, which you do to make the surface crisp and slightly brown, it changes. Don't get me wrong, it's still very good but that wow-factor fades slightly after cooking the meringue in an oven.

My belief is that if I was to brown the meringue with a burner instead of using the oven, not only would it get a crispier surface, but it would also leave the center of the meringue at its original, super yummy state.

Smulan also requests the recipe for whatever it is that I would like to make and if I win I would have to bake and show the results of it. =) Gladly!

Here is my current go-to recipe for Lemon Meringue Pie.

Pie Crust:
260 grams of flour
0.5 tablespoon salt
110 grams of butter
a few tablespoons of water
(and an optional pinch or two of sugar)
---
Mix or whip all ingredients but the water on low until it has formed a slightly lumpy mess.
Add tablespoons of water, one at a time until you have a good and not too crumbly dough. I think I usually use 3 tablespoons of water.
Wrap the dough in plastic wrap and store in the fridge for about an hour.

Place the dough between two baking sheets and roll it out fairly thin. Then place it in a pie dish(23 cm) and fit it. Cut off any excess dough.
Fill the crust with some dry peas and pre-bake at 175C for 10 min plus an extra 10 without the peas.
Remove from the oven and let it cool.

The lemon filling:
8 egg yolks
2 cans(about 800g) condensed milk
The zest and juice from 8 lemons
---
In a glass bowl add the yolks, condensed milk, lemon juice and lemon zest.
Mix very carefully until it's all well blended. I like to think of it as if I'm folding flavouring into a meringue batter. Don't overmix it or the chemical reaction will be broken and the mixture wont thicken as it should.
Pour the mixture into the pie crust and bake at 150C for 20-30 minutes.
It's ready when it's soft in the middle but doesn't wobble when you move it.

The Italian meringue:
6 egg whites
330 grams of granulated sugar
1 teaspoon of vanilla extract/essence
water
---
Pour the sugar into a small saucepan and add just enough water to cover the sugar.
Bring to a boil on medium heat.
Put the egg whites in your mixing bowl(I REALLY suggest a stand mixer for this) and whisk until it's slightly foamy - not thick like a meringue just until it begins to foam. Turn off the machine and leave it until the syrup is ready.
Let the syrup continue to boil until it passes the soft ball stage. When this happens, turn your mixer back on and set it to medium speed.
Slowly stream the syrup into your egg whites.
When all the syrup is in the egg whites, switch the mixer to high and let it work for about 10-15 minutes.
Swtich to medium and mix for a minute or so until the meringue has reduced a little in fluffiness.

Now you can spoon the meringue over your pie and put it back in the oven at 150C for about 20 minutes or until the meringue has gotten a nice color(this is where I would use the burner instead!).

Oh, and the pie is best served after it's completely cooled so either prepare it in the morning or the evening before and don't forget to make sure that the meringue completely seals the pie. There should be no gaps between the meringue and the pie dish or the meringue will shrink.

If you are worried about raw egg whites, don't! The awesome thing with Italian meringue is that as you are adding the syrup the egg whites are cooked by the heat of the syrup. That's why I think the burner would be great because the maringue doesn't need to be actually cooked in the oven. It's basically sent in there just to get some color and surface.

Tuesday, October 11, 2011

Leftovers

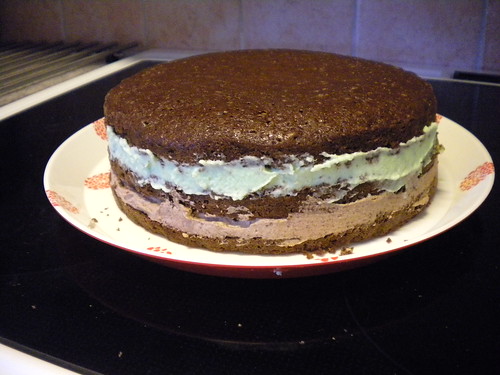
After Making the Hello Kitty cake I had quite a bit of leftovers. There was some After Either fluff, a whole lot of pear mousse and HEAPS of buttercream still in the fridge. At the same time my mother saw the cake and was drooling over it but never got to taste it because it was for my friend whose birthday was coming up. So I decided to whip up another batch of chocolate sponge and make some small replicas of the cake that I made for my friend. I did this by taking a round cookie cutter and taking out as many small rounds as I could from the chocolate sponge that I made. The result was three small, very tall cakes. They sort of remind me of the Mad Hatter's hat because they are so tall that they each ended up a little bit crooked. Just like the hat. =)


After butchering my chocolate sponge cake with the cookie cutter to the point where I couldn't get any more round pieces out of it I was left with a mess of crumbs and chunks of chocolate cake. I didn't feel like eating it all and I didn't feel like throwing it out so I did what every caker or cupcaker would have done: I made cake pops! Or cake balls in this case because I don't have any pop-sticks.

I crumbled the cake with my fingers and then meassured the ammount, lightly pressed into a deciliter measure. I had 2½ DL of crumbs and I added about 1½ DL of the huge lump of buttercream that I had lying in the fridge. Then I just mashed it together to a paste with a spoon and set it to rest in the fridge while I melted some chocolate. Then I formed the paste into small cake balls and rolled them in the melted chocolate and TA DA! Cake balls.

Monday, October 10, 2011

My first cake

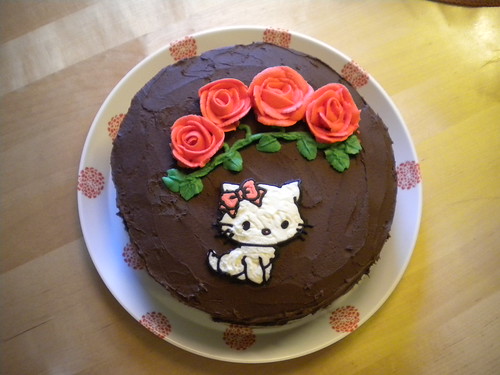
Last weekend I prepared my first ever REAL cake. Not the simple ones that I usually make with a store bought base, whipcream and strawberries. Nope, this was an all home made cake which started with a home made chocolate sponge which I split in three and filled. For the first layer I prepared an After Eight fluff and for the second layer I made a pear mousse. This was my first time making a mousse using gelatin by the way. I then made a huge batch of buttercream which I used to frost and decorate the cake with. All decorations are made of buttercream and they are my first every attempt aswell. My first time decorating with roses, my first buttercream painting etc. I'm not entirely satisfied with it but it's not too bad either. =)

Hello Kitty Cake by Cupcake Trainee
Hello Kitty Cake, a photo by Cupcake Trainee on Flickr.


Wednesday, October 5, 2011

Memories from the past

What a weird thing to say, really. Ofcourse memories are from the past, how else would they be memories? They can't be from the future.

Anyway today I made some bread. They are sort of based on a danish bread dough - the one where you squish butter into it and then fold it in three before rolling it out and repeating those steps a few times. These breadrolls smell and taste great but what's more - they bring back memories from a bakery by my grandmothers apartment. They had breadrolls that were square and with cheese on top and they were.. not quite flaky but the bread was in several layers inside and you could split the breadrolls with your hands if you wanted to. The bread wasn't very fluffy but with all the layers inside it - they still werent very dense.

Does anyone recognize this description? I would love to either find a bakery or a recipe for these bread rolls! Leave a comment if you think you can help me. =) Please

These are what I made today. Not quite the same but still very good.