Sunday, November 27, 2011

Frozen Candy Cane Cake and other romances

What should we talk about today? There has been so much going on. I keep on baking every day, every week... and I'm loving it. This week I focused on baking different types of cakes in school. I've been making them from scratch starting one day by making the base for the cakes in masses and the next few days putting them all together. It has been great fun and to be honest I think I fall in love a little with each one of my cakes. They're all a piece of art in their own way and the ones that don't come out perfect still symbolize my path to becoming more experienced and a better cake crafter.


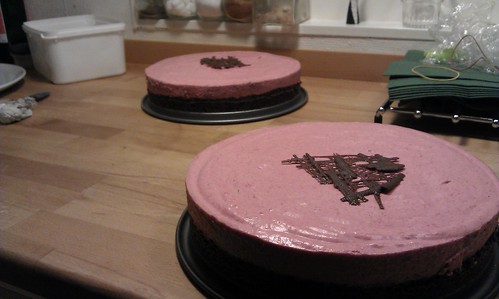
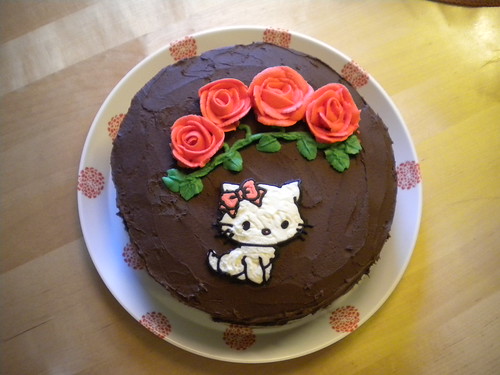
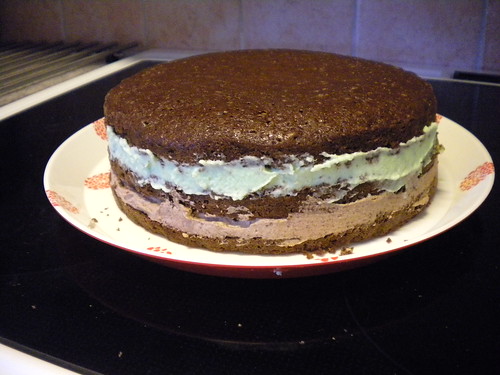
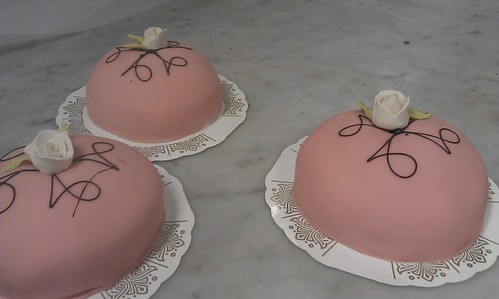
Anyway, on to something that might interest you a little more. This weekend was my mother's birthday and I ofcourse had the pleasure of baking the desserts for her party. She requested a rerun on the minty marshmallow fluff cake that I made this summer. She really likes that cake. It's like the smoothest textured icecream cake you've ever had and it's so easy to make. Nobody would ever know!

Frozen Candy Cane Cake
For the crust:
20 chocolate cookies/bisquits
2 tablespoons cocoa

For the icecream fluff:
5 deciliters heavy cream
1 jar of marshmallow fluff
peppermint oil/essence/flavour
red food coloring
candy canes

For the chocolate sauce:
125 grams dark chocolate
75 grams butter
½ deciliter sugar
½ deciliter light syrup
salt
½ deciliter water

The crust:
Melt the butter, put the cookies, butter and cocoa in a food processor and mix until it's all crumbs.
Press into a springform, press some up on the sides if you wish, else just make the bottom a little thicker. Put in the freezer for now.

The icecream fluff:
Whip the cream until soft peaks form.
Mix the marshmallow fluff with some of the whipped cream until it's loose enough to easily fold into the rest of the whipped cream. Do so.
Add peppermint flavour to taste. Put about a third of the mixture in a separate bowl and save for later.
Crush the candy canes with a pestle and mortar until fairly finely crushed. It's ok if there are some larger bits.
Mix the crushed candy canes with the larger batch of fluff. Pour this mixture into the springform.

Take the rest of the mixture and add a few drops of red food coloring until nice and pink. Drop blobs of this onto the cake.
Use a knife to slightly swirl it around, mixing it with the rest of the fluff.
Put back in the freezer for atleast 5 hours but it can be made well in advance.

The chocolate sauce:
Put all the ingredients for the sauce in a pot and bring to a boil.
Stir until all chocolate has melted.
Let the sauce simmer for about 10 minutes or until the sauce thickens and gets glossy.

Personally mine never thickens while it's boiling but 10 minutes is usually good enough. You can make the sauce in advance as well and when it's time to serve just take the cake out of the freezer 5 minutes ahead of time and reheat the sauce in the microwave.

This cake is so nummy if you put the warm sauce in the bottom of a plate and put a slice of cake on top of it. The flavours in the crust really comes out then. That's all for today. Next time I'll tell you about this really nummy buttercream that I used for the biskvies that I made for my mother's party as well.

Monday, November 14, 2011

Pear Marmalade with Honey

I've been posting alot about my baking adventures lately but I hardly ever post any recipes. Originally I wasn't going to . I wanted this blog to be about my adventures and the things I've learned on my quest but let's face it. How mean isn't it to post about all these nummy things and not tell you how to make them? So I will slowly start adding my recipes as well. It's probably a good idea. That way I have everything gathered in one place and I wont lose my recipes or confuse them with each other.

Pear Marmalade with Honey
1.5 kg Pears(peeled and cored)
1 Lemon(0.75 dl lemon juice)
25 g Ginger(fresh)
500 g Jam Sugar(syltsocker)
3 tablespoons Honey


Afgter peeling and coreing the pears, cut them into small pieces and put them in a pot.
Squeeze the lemon and pour this over the pears.
Bring the pears to a boil then simmer on low heat for about 10 minutes(until the pears are soft and mushy).
Peel the ginger and cut them julienne(or in small pieces).
Add ginger, jam sugar and honey to the pot and let it boil strongly for at least 2 minutes.
Put the pot aside and leave it for 5 minutes.
After 5 minutes, skim the pot using a perforated ladle.
Pour the marmalade into hot, sterilized jars.

This marmalade is very sweet and it's hard to decide whether it's more like honey or more like marmalade. I made3 a second batch and reduced the jam sugar to about 425-450 gram and it turned out much better in my opinion.

Now let's talk about methods. When I make jam and other perserves I prefer to use air tight glas jars. I start by cleaning them thoroughly. Even if they're already clean. It's very important to use very clean jars. I then pop them in the oven on a damp towel on a low heat(about 100C) for at least 20 minutes.
Right before it's time to fill them I take them out of the oven and rinse the insides with a little bit of Sodium Benzoate dissolved in water.
When the jars have been filled I immediately put the lid on, turn them upside down and leave them until cooled off completely.


If you want to take things one step further you can also mix some Sodium Benzoate with a spoonfull of marmalade which you then mix with the rest of the marmalade.

And if you don't want your marmalade to turn brown you might also consider adding some Ascorbic Acid to the marmalade.

Both the Ascorbic Acid and the Sodium Benzoate can be bought in a regular grocery store. Usually near the baking supplies. Dosage for mixing it into jams and marmalades is usually found on the package. For the rinse I mix about half a teaspoon of Sodium Benzoate and half a litre of water.

Friday, November 11, 2011

Glögg - a Swedish Christmas Tradition

A few days ago(three to be exact) I started a project: to try to make my first glögg ever. Usually I just buy my glögg at the liqeur store. They have great varieties there. Some with raspberry, some with whiskey, vanilla. Every year there's a glögg of the year, a speciall flavor but a few days go I decided to make my own. It's not hard if you take a small shortcut and skip fermentation.

Do you guys know what glögg is by the way? In case you don't; It's a Swedish version of eggnogg I suppose. It isn't anything like an egg nog but it is what we drink around christmas. Originally to keep warm during the cold winters. The word glögg comes from the word "glödga" which originally meant "to heat up". Glögg is, simplified, wine that has been spiced up with Christmas spices, sweetened and then heated up. I heat mine to about 55-58C.

Some glögg can be overpowering if it's been spiced up with too much whiskey or sherry. The recipe that I found, however, had a perfect balance of spices and sweetness and eventhough it is quite potent the taste isn't overpowered with hard liqeur. I found the recipe on a Swedish blog called Kastrullresan and I find that place very inspiring. You can visit it here: http://www.kastrullresan.com/

If you want to try a typical Swedish Christmas tradition, here is the recipe. Translated and everything. =)

You'r going to need:
15 cl of vodka or other pure, hard liqeur
10 gram Cinnamon
1 ½ gram Clove(about 20?)
1 piece of dried Ginger
2 gram crushed Cardamom
½ Seville orange peel

1 litre Red whine(any, cheap kind will do)
2 deciliter Sugar
1 teaspoon vanilla sugar

Step one:
Crush the cardamon
Break up the cinnamon into smaller pieces
Put the cinnamon, clove, ginger, cardamom and seville in a glass jar.
Pour the liqeur on top and close the lid/cover.
Leave this for about 3 days, less if you want a less Christmassy taste.

Step two:
After 3 days strain the liquid and put it in a pot. Add the wine, sugar and vanilla sugar and head slowly on low head. Don't let it boil or the alcohol will evaporate. Stirr once in a while until the sugars have dissolved completely. Done!

The taste will improve even more if you leave this until the year after, in sealed bottles. But I suspect my glögg wont survive that long, sadly.

Reheat the glögg before serving.  In Sweden we serve it in small glasses and add raisins and blanched almonds. Enjoy!

Tuesday, November 8, 2011

Raspberry Mousse Cake

In Sweden we honor our dead once a year on all saints day by going to the graveyard, placing flowers and lighting candles. It's a nice oportunity to stop and just remember. In a stressful world as ours. It is so beautiful this time of the year when the light is fading and the memorial park is full of flowers and candles. It always leaves me in a spiritual mood..

After a fairly cold evening at the graveyard we usually go home and have a nice dinner with family and relatives. Since our family is growing quite large I offered to help out by making desert. This time I decided on a wonderful combination of raspberry mousse on a chewy chocolate mudcake base. It looks professional, tastes wonderful and doesn't require too much effort. This was my first time making a mousse cake so I was a little bit worried about whether I could pull it off or not. Therefore I made a small batch a few days ahead to test the recipe. I made the small batch in large american cupcake liners. This also works great if you want to serve portion sizes. I could even peel the liners off leaving a small portion sized mousse cake. Cute.

Anyway, this is what the actual cakes looked like. I topped them with some chocolate just because I had some melted chocolate left over from when I made the cookies and rather than wasting it I decided to use it to practice.

Sunday, November 6, 2011

One day a few weeks ago the neighbor came knocking on our door. He asked if we wanted pears off his pear tree before he threw them out. All we had to do was to go pick them. That is how I ended up with 17 kilos of very sweet and juicy pears. That was the perfect oportunity to make marmalade and jams. Spread out over the weeks I have been trying different recipes. It's not hard at all to make marmalade. Especially not if you use the special sugar with added pectin. It is a bit time consuimg though. Especially if you want to be thourough and sterilize jars and so on.

After a few days spent in the kitchen peeling, dicing and boiling pears I ended up with quite the collection of jams as well as a few jars of pear sauce. There's pear marmalade with honey and ginger, pear marmalade with lemon and vanilla and pear marmalade with lemon, ginger and walnuts. They are all very nummy and so far we have opened a couple of jars of the honey marmalade - it's great with some brie white mold cheese.


I even printed out some nice tags for the jars so that I don't forget whats in them.

Sourdough Bread - My first Herman

As I mentioned in my last, rather messy post, I have been baking alot. I have learned so much over the past few weeks and I have gained some confidence in working with different types of dough. You might even say that I've lost some respect for dough which is making me more daring. =)

This in turn has led to my first little baby steps into the world of sourdough. As you probably know the first thing you need to do when you want to play with sourdough is to make a sour dough base. A Herman - as many people would call it. This can be made in many different ways but the method that I used was based on raisin soaked in water and mixed with some different types of flour. This is then set to rest somewhere nice and warm for a few days while you feed him flour and water once in a while as well as shaking him twice a day. on the 5th day or so he should be bubbling rather vigorously. My Herman even bubbled over the icecream box that I was storing him in - making a huge mess of sourdough puke inside my cupboard. Bad Herman!

Anyway, once the base is ready it can be used in all kinds of nummy breads using little or no yeast. Most recipes choose to use yeast anyway to secure the rising process and make it a little faster because sourdough needs to rise much longer than ordinary bread. Some for hours, some for DAYS!

Here is the result of my very first sourdough bread. I am actually very satisfied with this bread. It is a very rustic looking bread that would look great next to that shabby chic cupcake black board(the one I never actually bought). This bread smelled so good and the crunchy crust and sort of half chewy texture completed the experience.


I might actually suggest that this is the best bread I've ever eaten.

Saturday, November 5, 2011

Wiener Bread

I know this place might seem quiet but boy have I been active. I have been baking more than, I think, ever before in my life and I feel great.

A few weeks ago I started a new education with focus on baking and café life. Every day I spend about 4 hours in the bakery learning how to make different things, work different types of dough and braid using different techniques and I've been using my new skills while baking at home as well. Last weekend I spent almost an entire day playing with what we call wiener bread. It is what you would call a Danish in English as far as I know. The fun part is getting my hands on real bakery recipes - I am copying them all, or as many as I can at least. The only problem is that the recipes usually call for obscene amount of ingredients. One recipe used about 10 kilos of flour - after I HALVED the recipe. That's hardly something I would do at home. I would need to borrow the whole neighborhood's freezers to store all the bread that would give me.

Anyway, here are some pictures of the Danishes that I made at home last week.

This is the classic type of wiener bread that you will most likely find in a store or bakery shop.


And here is my favorite. It doesn't have jam or vanilla custard filling like the ones in the picture above, but it is so moist and nummy, and a little less sweet. This braid that I made isn't very visually appealing because I made it a little too big. I probably could have made 4 braids instead of 2 with that amount of dough. Maybe next time.


And here is the inside of my favorite braid. You can see all the layers of dough and how moist and gooey it is.


In case you have no idea what wiener bread is all about, this is how it's made: You start by making a dough that is similar to the ordinary sweet wheat based dough but you don't quite knead it as hard. It can be just a little bit sticky too. You then push your dough out into a big square and put a big block of margarine in the middle. Fold/pull in the edges over the butter to cover it, then beat it a little bit until the dough and butter is stuck together. You then grab your rolling pin and roll it out, gently, into a rectangle. Fold it in 3 parts, turn 45 degrees and let it rest for 5 minutes - possibly in the fridge depending on what kind of margarine you're using. Repeat the steps from rolling pin and on 2 more times and your basic wiener dough is ready to shape into whatever it is you're making.

This method makes the dough very flaky as it bakes and very moist on the inside. Definitely worth the effort.

As for the filling: For the classic style wiener bread you cut out squares of about, say 10 cm, and then you put a small dab of something called remons which is pretty similar to buttercream in the middle of the square. Take each corner and pull it to the center and squish it into the remons. This hole will later be filled with custard or raspberry jam or whatever the baker likes.

There is so much more to talk about and I have so many other projects that I would like to discuss but I just got home from a party and I am exhausted. I hope to update the blog over the next few days to show some of my other baking adventures that I've had lately.

Thursday, October 13, 2011

Competition and my go-to recipe for Lemon Meringue Pie

So, I logged in at bloglovin.com - that is where I keep all my favorite blogs nowadays. They're so many now that I can't possibly keep track of them all on my own. Anyway, through bloglovin I found out that Smulan over at Smulans Bakblogg is holding a competition and the prize is three(3) Flame Boy Burners. The question she asks us is "What would you want to make if you owned a burner?".


Easy! The first thing that popped into my head was Lemon Meringue Pie.
If you remember; I have made lemon meringue pie several times and my favorite meringue to top the pie with is the meringue of all meringues(in my opinion at least): Italian meringue!

Here's the catch tho. Italian meringue is gorgeous. The texture is amazing and I would eat the whole batch of it straight out of my mixing bowl if I could. But when you bake it in an oven, which you do to make the surface crisp and slightly brown, it changes. Don't get me wrong, it's still very good but that wow-factor fades slightly after cooking the meringue in an oven.

My belief is that if I was to brown the meringue with a burner instead of using the oven, not only would it get a crispier surface, but it would also leave the center of the meringue at its original, super yummy state.

Smulan also requests the recipe for whatever it is that I would like to make and if I win I would have to bake and show the results of it. =) Gladly!

Here is my current go-to recipe for Lemon Meringue Pie.

Pie Crust:
260 grams of flour
0.5 tablespoon salt
110 grams of butter
a few tablespoons of water
(and an optional pinch or two of sugar)
---
Mix or whip all ingredients but the water on low until it has formed a slightly lumpy mess.
Add tablespoons of water, one at a time until you have a good and not too crumbly dough. I think I usually use 3 tablespoons of water.
Wrap the dough in plastic wrap and store in the fridge for about an hour.

Place the dough between two baking sheets and roll it out fairly thin. Then place it in a pie dish(23 cm) and fit it. Cut off any excess dough.
Fill the crust with some dry peas and pre-bake at 175C for 10 min plus an extra 10 without the peas.
Remove from the oven and let it cool.

The lemon filling:
8 egg yolks
2 cans(about 800g) condensed milk
The zest and juice from 8 lemons
---
In a glass bowl add the yolks, condensed milk, lemon juice and lemon zest.
Mix very carefully until it's all well blended. I like to think of it as if I'm folding flavouring into a meringue batter. Don't overmix it or the chemical reaction will be broken and the mixture wont thicken as it should.
Pour the mixture into the pie crust and bake at 150C for 20-30 minutes.
It's ready when it's soft in the middle but doesn't wobble when you move it.

The Italian meringue:
6 egg whites
330 grams of granulated sugar
1 teaspoon of vanilla extract/essence
water
---
Pour the sugar into a small saucepan and add just enough water to cover the sugar.
Bring to a boil on medium heat.
Put the egg whites in your mixing bowl(I REALLY suggest a stand mixer for this) and whisk until it's slightly foamy - not thick like a meringue just until it begins to foam. Turn off the machine and leave it until the syrup is ready.
Let the syrup continue to boil until it passes the soft ball stage. When this happens, turn your mixer back on and set it to medium speed.
Slowly stream the syrup into your egg whites.
When all the syrup is in the egg whites, switch the mixer to high and let it work for about 10-15 minutes.
Swtich to medium and mix for a minute or so until the meringue has reduced a little in fluffiness.

Now you can spoon the meringue over your pie and put it back in the oven at 150C for about 20 minutes or until the meringue has gotten a nice color(this is where I would use the burner instead!).

Oh, and the pie is best served after it's completely cooled so either prepare it in the morning or the evening before and don't forget to make sure that the meringue completely seals the pie. There should be no gaps between the meringue and the pie dish or the meringue will shrink.

If you are worried about raw egg whites, don't! The awesome thing with Italian meringue is that as you are adding the syrup the egg whites are cooked by the heat of the syrup. That's why I think the burner would be great because the maringue doesn't need to be actually cooked in the oven. It's basically sent in there just to get some color and surface.

Tuesday, October 11, 2011

Leftovers

After Making the Hello Kitty cake I had quite a bit of leftovers. There was some After Either fluff, a whole lot of pear mousse and HEAPS of buttercream still in the fridge. At the same time my mother saw the cake and was drooling over it but never got to taste it because it was for my friend whose birthday was coming up. So I decided to whip up another batch of chocolate sponge and make some small replicas of the cake that I made for my friend. I did this by taking a round cookie cutter and taking out as many small rounds as I could from the chocolate sponge that I made. The result was three small, very tall cakes. They sort of remind me of the Mad Hatter's hat because they are so tall that they each ended up a little bit crooked. Just like the hat. =)


After butchering my chocolate sponge cake with the cookie cutter to the point where I couldn't get any more round pieces out of it I was left with a mess of crumbs and chunks of chocolate cake. I didn't feel like eating it all and I didn't feel like throwing it out so I did what every caker or cupcaker would have done: I made cake pops! Or cake balls in this case because I don't have any pop-sticks.

I crumbled the cake with my fingers and then meassured the ammount, lightly pressed into a deciliter measure. I had 2½ DL of crumbs and I added about 1½ DL of the huge lump of buttercream that I had lying in the fridge. Then I just mashed it together to a paste with a spoon and set it to rest in the fridge while I melted some chocolate. Then I formed the paste into small cake balls and rolled them in the melted chocolate and TA DA! Cake balls.

Monday, October 10, 2011

My first cake

Last weekend I prepared my first ever REAL cake. Not the simple ones that I usually make with a store bought base, whipcream and strawberries. Nope, this was an all home made cake which started with a home made chocolate sponge which I split in three and filled. For the first layer I prepared an After Eight fluff and for the second layer I made a pear mousse. This was my first time making a mousse using gelatin by the way. I then made a huge batch of buttercream which I used to frost and decorate the cake with. All decorations are made of buttercream and they are my first every attempt aswell. My first time decorating with roses, my first buttercream painting etc. I'm not entirely satisfied with it but it's not too bad either. =)

Hello Kitty Cake by Cupcake Trainee
Hello Kitty Cake, a photo by Cupcake Trainee on Flickr.


Wednesday, October 5, 2011

Memories from the past

What a weird thing to say, really. Ofcourse memories are from the past, how else would they be memories? They can't be from the future.

Anyway today I made some bread. They are sort of based on a danish bread dough - the one where you squish butter into it and then fold it in three before rolling it out and repeating those steps a few times. These breadrolls smell and taste great but what's more - they bring back memories from a bakery by my grandmothers apartment. They had breadrolls that were square and with cheese on top and they were.. not quite flaky but the bread was in several layers inside and you could split the breadrolls with your hands if you wanted to. The bread wasn't very fluffy but with all the layers inside it - they still werent very dense.

Does anyone recognize this description? I would love to either find a bakery or a recipe for these bread rolls! Leave a comment if you think you can help me. =) Please

These are what I made today. Not quite the same but still very good.

Sunday, September 25, 2011

I'm So Excited!

I can't say I've baked much lately. Just some various bread and cinnamon rolls. Nothing special but equally delicious. However for my birthday I got a big shopping bag full of cupcake and cake decorating tools, sprinkles ect. from my sisters. One thing that I got was sugarpaste which I have never worked with before and I am so excited to start working on it. Yet my cupcaking has been sort of idle lately. I guess I got bored with just frosting swirls - all I had was a couple of star tipped piping nozzles and 2 round hole nozzles. BUT NOT ANYMORE! I have just ordered a 52 piece piping set. Yes thats right. FIFTY TWO pieces in a nifty little box. Rose pins included. I can't wait til I get them so that I can start practicing.


Oh, I almost forgot. I signed up with bloglovin. Mostly for my own sake because I keep getting lost in my blog-jungle that I have created in my Favorites folder but in order to claim this blog as my own I have to post this little strip of code here so if you feel up to it Follow my blog with Bloglovin

Friday, September 9, 2011

Simple things

I went to a small store in an old, rustic farmhouse today. They had a lot of simple, yet beautiful things for sale. Plates, silverware and unique pots to name a few.

However when I stumbled upon this item I instantly fell in love with it. Oh, how I wished that I could have it. But where would I put it? It doesn't go with anything else in the house. Isn't it beautiful? It has a great message too: Life is sweet - indulge your senses, nourish your soul.

Tuesday, September 6, 2011

Apple Pie


A few years ago I didn't even like apple pie. In fact, I hated it. It was something about cooked apples that just I just didn't get along with. To make thing even strangers I also loved apples. I could easily down five apples a day and they would always be Granny Smith apples. Those were the only ones I really liked. Still to this day I pretty much only eat Granny Smith apples.

Anyway, yesterday I wanted to bake so I flipped through my The Hummingbird Bakery Cookbook book and as I flipped past the apple pie recipe I remembered that Somebody in my environment loves apple pie. So I would have someone to feed it to! And sure enough, most of it is gone already, although personally I would have liked some sweetness added to the pie crust. The recipe for the pie crust that the book uses only calls for flour, salt, butter and some water. This kind of crust I would normally use for savoury pies. Everybody else seemed to like it tho so maybe it's just that I have a monstrous sweet tooth?


Now, this part isn't in the book or in the picture but from the sugary cinnamon water that was left over from boiling the apples I decided that rather than to waste all that nummy flavor I would make a apple cinnamon syrup. After I removed the apples from the pot I continued to boil the water mixture until it started to thicken. By then the butter started to seep out which I then removed as much as possible of. This syrup/sauce is really good if server hot with the cooled off apple pie. I would almost say it's better than the pie itself!

Thursday, September 1, 2011

Frozen Candy Cane Pie

Here's a pie that I made a while back. The recipe has been all over the Swedish food blogs and it seems like it always turns out as wonderful, whoever makes it. It's basically a chocolate pie crust with a mixture of marshmallow fluff, whipped cream and crushed candy canes. Smooth, sweet and cool. The chocolate sauce was really good aswell. I will definitely make this again. It's only flaw is that it is so easy to eat.

Here's the gorgeous thing:


Thursday, August 18, 2011

A birthday party

A birhday party is the perect opportunity to play around in the kitchen. For this party I made 2 types of cookies - sugar cookies and chocolate chip cookies aswell as a lemon meringue pie.

The sugar cookies that I made were from The Hummingbird's cook book and I decorated them using an icing recipe from the same book. I think I prefer this icing recipe over my other ones. It's quite firm and doesn't get all over the place - perfect for piping and doesn't get too wet even with liquid food coloring.

As for the chocolate chip cookies; I'm trying to find a recipe that gives cookies close to Subway's cookies. These ended up looking alot like them but they were crunchy, not soft and chewy like the Subway cookie. I think that maybe if I let them bake for a shorter time in the oven they may have come out less crunchy. Next time I'll try that.

The lemon meringue pie was sort of a disappointment. The first time I made it, I messed up with the filling so that it didn't set but the italian meringue came out perfect. This time however, the filling was beautiful but the syrup for the italian meringue kept crystalizing so I ended up with a regular meringue instead. That works too but it's not quite as good nor especially impressive.

Thursday, July 21, 2011

Chocolate Chip Cookies


Sadly I haven't been baking too much lately. You see, I have two main interests in life. One is baking, the other is fitness. It might seem like an odd combination but there you have it. So this summer I've gotten more and more focused on fitness and therefore there's been less room for my baking passion. My freezer is full of cupcakes, cookies, cakes etc. and I've been desperately trying to hand them out to make space for my new ideas.

However, a while back I did bake something. I tasted a Subway cookie that my friend bought and I was inspired to find this recipe, or a very simlar one. The quest to find the Subway cookie has begun. This recipe that I tried claimed to be very close to it but as you can see, it really is nothing like it. So the quest continues..

In the picture you see a mix of cookies using the same recipe that have been baked using different methods, temperatures and baking time. All to try to find a cookie that is as close to the Subway cookie as possible.

Thursday, May 19, 2011

Not a Cupcake

This isn't exactly a cupcake but they came out so well that I had to share them anyway. Besides, who says I can't bake other things just because I'm the Cupcake Trainee? :)

This creation consists of a brownie base, a cheesecake layer and a raspberry cream layer. I topped it off with a raspberry.

They were absolutely delicious, by the way!

Friday, May 13, 2011

My mother is my best customer

Probably because I do it for free and because I don't actually have a company!

She wanted some cuppy cakes to bring for her last day of dance classes. Afterwards she told me they were very apreciated and it's already been requested that I make some for the end of next semester too! It always warms my heart to hear good feedback. So here's a sample of what I made:


Banana Vanilla by Cupcake Trainee
Banana Vanilla, a photo by Cupcake Trainee on Flickr.

Monday, April 25, 2011

Candy Cupcakes

Mini Candy Cupcake by Cupcake Trainee
Mini Candy Cupcake, a photo by Cupcake Trainee on Flickr.


Easter has given me a much needed vacation to recharge my batteries and enough time to bake.

Around Easter there's always so much candy around. Friends show up with gifts of candy. Children are given more candy than they could possibly eat. In every home there's the mandatory bowl of Easter candy and chocolates. This year I decided to put my left over candy to good use and incorporate them into my baking addiction.

The only thing better than cupcakes is CANDY cupcakes!

Here's an example of the insides of one of my candy cupcakes:

Candy Cupcake

Thursday, April 21, 2011

Happy Easter!

I've been so busy the past few weeks and while I've still been baking and cooking away, I haven't made alot of cupcakes. I may start to upload some of the other things I make if anyones interested. I like to try unusual things which is the reason I have quite a few kitchen-disasters!

Anyway, spring is here and I did make an Easter cupcake. I know my last upload had some Easter eggs but this will be my official Easter cupcake.


Not only is this cupcake gorgeous on the outside, it's even better on the inside! If I may say so myself.


The flavors of this cupcake are vanilla cake with a sweet marshmallow filling and chocolate frosting. I topped it with some candy eggs to add to the fun theme.

I hope you get lots of candy and good food this weekend. Happy Easter!

Wednesday, March 30, 2011

Da capo, again.

This is the second or third time that I've been asked to make this recipe. This time it was for a party and I'll never turn down an opportunity to make cupcakes! I must say that I think I have improved since the last time. The little white peek-a-boo under the frosting hints that theres something more to it than just chocolate. I thought I' upload a picture even if you've seen it before.


With the left overs from the requested cupcakes I decided to decorate the vanilla muffins that I had left from this weekend's cupcaking. I just had fun with it. The white stuff is actually the marshmallow filling that is supposed to be inside the cupcakes! I also added a little easter-touch to it, I know it's too soon but atleast I'm holding back on my real easter treats until later. =)

Monday, March 28, 2011

Progress and Failures

This isn't just a blog for my finished cakes of awesomeness but it is also a blog where I share my thoughts as I go along learning about making cupcakes. Hence the name "Cupcake Trainee" - that's me! So I figured it was time for some of my failures and what I have learned from it. Yesterday I was in the mood for making cupcakes(I always am but I had the time yesterday). So I ran down to the store and grabbed some things that I needed for my newest project. I wanted to make a beautiful vanilla strawberry cupcake with a very strawberry-core. At the store I grabbed a package of cupcake cases. When I got home, the first thing I noticed was that the cupcake cases didnt match my cupcake pan very well, they were too small! But I decided to use them anyway since they could still sit inside my pan. I shouldn't have.


The random size of the cupcake cases should have posed as a warning that these were not good quality cups. I didn't notice it at first but after the cupcakes had cooled, I saw - and felt - that the bottom of it was all soggy and wet. They weren't waterproof! How silly. What I learned from this was that I want good quality cups and I think I've also got a fairly good idea now of which cups I like and which ones I want to avoid.


Another thing that I learned yesterday was that you shouldn't ever use light products, especially not in frosting. After frosting my strawberry vanilla cupcakes I ran out of cream cheese so I substituted with the cream cheese I usually put on my sandwiches which is a light product. While whipping it up I looked away for a second and when I looked back it was suddenly over beaten and had started to look like, well vomit to be honest. So I decided it wasn't worth ruining my cupcakes with it and tossed it instead. The cupcakes will rest safely in my freezer until tomorrow when I'm frosting some cupcakes for an order that I got. I choose to call it an order because it feeds my ego! It's really just my mother who's asked me to make some for a party she's holding on wednesday.


Anyway, here's the result of yesterday's cupcaking. I must say that this is one of my new favorite frostings. It's so light and fluffy - almost like whipped cream but smoother and sweeter. By the way, did you notice that learned a new piping method?

Saturday, March 19, 2011

Godly Mint-Chocolate Cupcakes!

It's been a while since I last made cupcakes because I honestly don't have alot of people around me that I can feed them to and I certainly can't eat them all myself! But today I had a friend come over and she requested that I'd show her how to make cupcakes and we had alot of fun doing so. =)


The request was "something chocolate" preferably with mint. So that's what we did. Mint Chocolate Cupcakes.

Here is the result, not too shabby if i may say so myself.

I got a little ahead of myself and took the pictures before I finished decorating all of them.

Thursday, February 10, 2011

Vanilla Cupcakes

The other day i made a rather large batch of vanilla cupcakes. Unfortunately, I didnt like the result - the base tasted more like a muffin than a cupcake. So yesterday I decided to make or break it and tried to save them. If nothing else, I'd get a chance to practice piping.

What I did was that I mixed together hazelnut creme, butter, a little bit of confectioners sugar and a tiny bit of milk into a semi-soft creamy mix. My plan was to cut a hole in the middle of the cupcake and fill them with the mix, and so I did. I then finished them off by piping the top with a new frosting recipe that I wanted to try. It worked alright. The cupcakes now tasted great and with the filling got a much lighter and moist texture. However I wasn't quite satisfied with the frosting - it tended to collapse slightly. As I was feeling naughty I tossed the hazelnut mix into my frosting and lo and behold! It worked great. I successfully made a nice looking frosting, with a nice texture and a good hazelnutty flavor which also held together great. Im proud!


Monday, February 7, 2011

Chocolate Marshmallow Surprise Cupcake

Here's an absolutely delicious cupcake that I made. The base is a chocolate cupcake that is light and fluffy, yet moist and creamy and the frosting is a simple frosting made of butter, powdered sugar and cocoa which is very sweet and surprisingly full of flavor. As if that's not enough theres a treat hidden inside! A marshmallow cream that has been pumped into it with the help of a piping bag until the cupcake got very heavy. This is a very tasty dessert which has been very apreciated by everybody who's tried it. My favorite so far.


Friday, January 28, 2011

Butter in frosting

When making basic frosting using butter, flavor, powder sugar and fluid. If you want a more glossy frosting, use the liquid butter and if you want a matte frosting use real butter. Keep in mind that using the liquid butter makes the frosting softer and so it's not suitable for piping.

My first cupcake

I've been looking at cupcake blogs for a while and I've been so impressed and inspired so I wanted to get into cupcake craft. I recently bought a book about cupcakes. It's hard to find good cupcake recipes in Swedish but this book was written by an American so I decided to put some trust in it.

Here is my very first batch in my cupcake career. I know it's not exactly a work of art but they turned out okay and I'm definately proud of them.